Search This Blog

Monday, December 25, 2017

X-Mas Day Progress 3kw Cyclone

Didn't have much time today to work on the Cyclone bike. 

I built a few bikes for family presents, then I had some time for the project. 


It's not much, but it's better than nothing. I painted the controller to match the rest of the bike. Then I drilled the frame and popped a couple rev nuts in to hold the controller mounting bolts. Painted the rev nuts, then mounted it. I still have to modify an allen wrench to get behind the wire bundle to tighten up that bolt. I could of used a regular bolt, but I had a couple stainless steel allen head bolts that fit the rev nuts, so I used them. I want all the hardware I use on the project to be stainless steel so I won't have to change it out later. Doing it right the first time is not overrated!

Before I decided on mounting location, I made a cardboard cut out of the basic battery box to figure the height. The wires will all fit up inside the battery box.


This is going to be the large sized battery box to fit as many cells I can for a 72V setup. The back of the box will be right on top of the controller. As it approaches the front down tube it will taper down below the top of the motor.

I was going to mount the ebike brake levers and the thumb throttle, but it was getting late and I was ready to go get something to eat. I'll get that done tomorrow and figure how I want to make the custom wire harness. I did mount the batman display although I don't like it much up on the bars.


Sunday, December 24, 2017

3000W Cyclone Assembly Day (Part One)!

I finally had a chance to start assembly of the In The Barrel 3 Speed with the 3000W Cyclone motor today! 


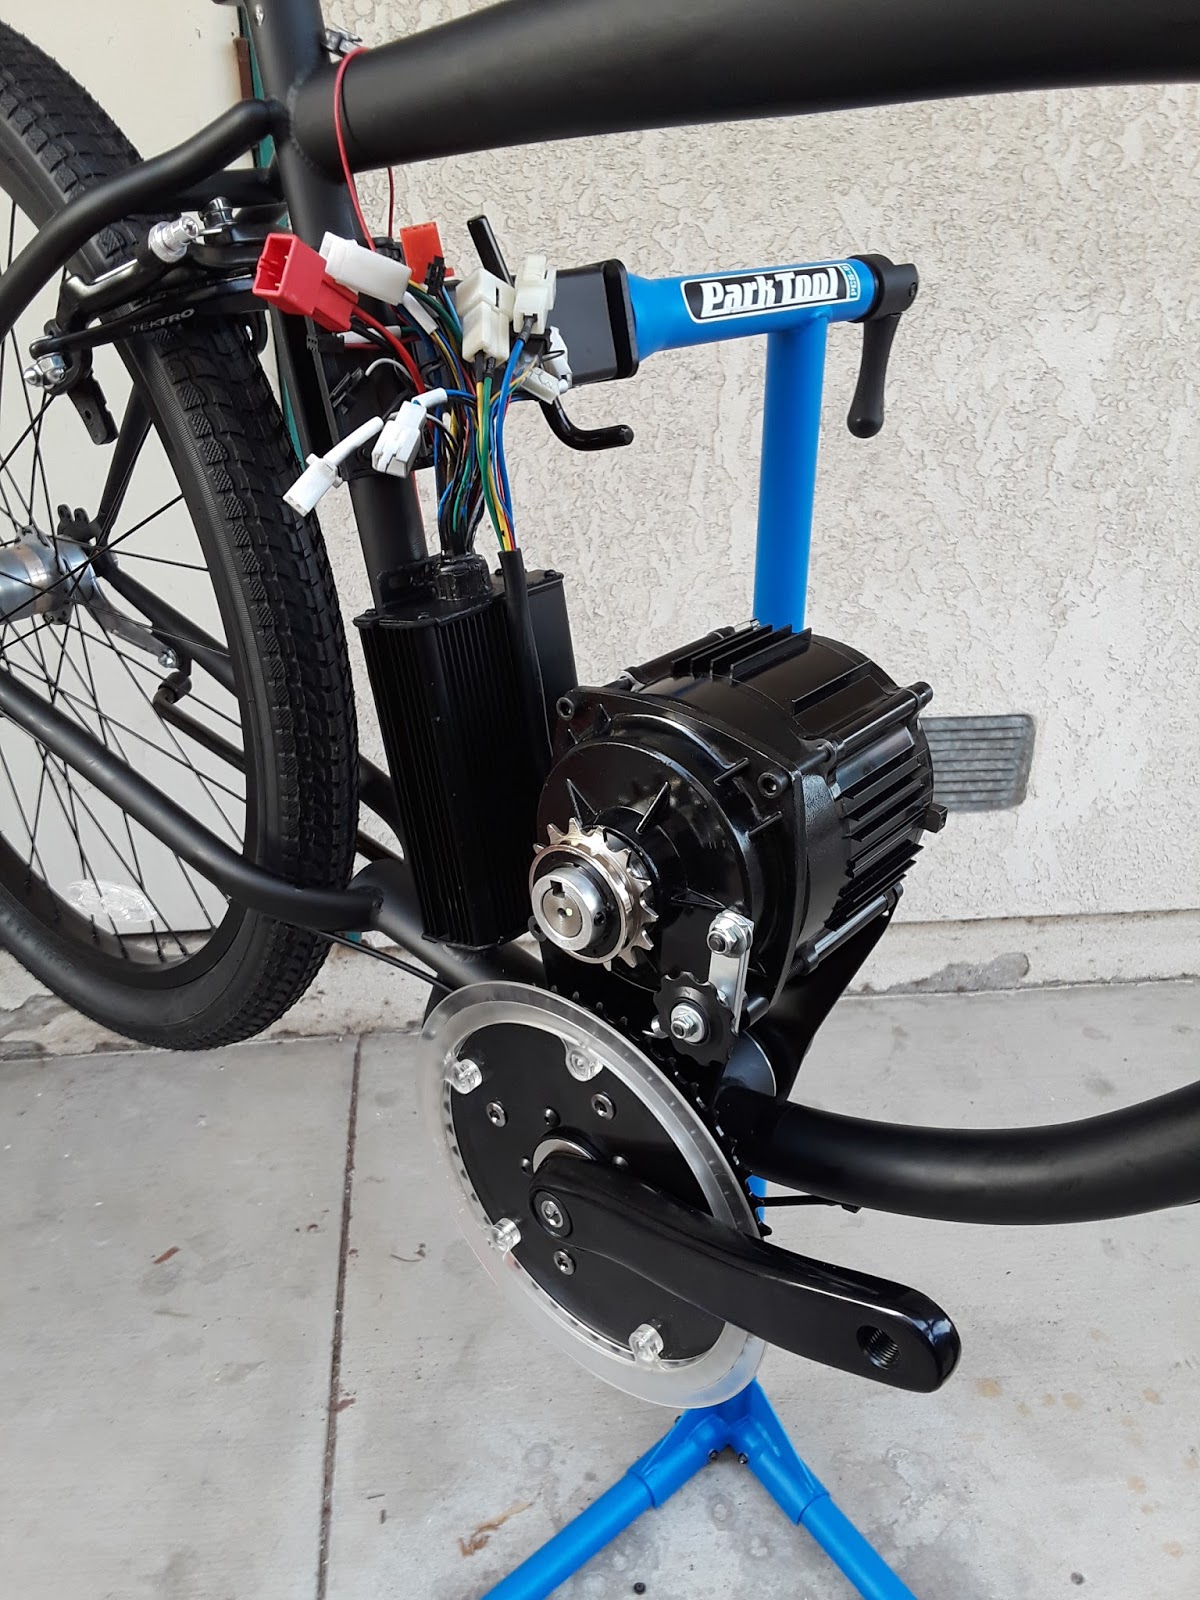
I don't know If I'll be keeping the motor positioned where I have it now. If I wind up attaching the controller to the seat tube as it sits in the above and below photos, then this position is perfect. You won't see all these wires when I'm done. They will all tuck nicely up inside the battery box above the motor. 

This is one of two ways I'm thinking about offering the bike. With the controller like this, I will have no problem making the battery box large enough for a 72V battery.


In the below photo, you can get a better idea of the other way I want to offer this bike. The controller would be mostly inside the battery box, but hang out the bottom of the box by about 1/3 of it's height for better cooling than if it were just inside the box. This will be a pretty cool way to do it low profile while keeping the controller and batteries cooler for maximum longer life! I wouldn't want to just bolt it to the bottom of the battery box. I like my low profile idea much better. 

The only drawback I see is I don't think I can get enough cells inside the box this way for a 72V 20Ah battery with the controller taking up some room inside. I should have enough room for a 60V setup, and no problem fitting a 52V 20+Ah battery! 

With the controller tucked up in the bottom of the box, I'll have room to move the motor back closer to the seat tube, and add an additional clamp for the motor to the seat tube.


I hate having spare brackets on a bike that are not used for anything, so I drilled a hole in the Cyclone drive side bracket to use a bolt with a small spacer attached to the front chain guard bracket. Eventually I'll be making my own bracket for the drive side. I don't like the factory bracket! My bracket will also have room for a better chain tensioner, and will have an extra part to attach it to the chain stay. This will totally eliminate any motor creep from torque.


Below is another view of the little bracket I used to help keep the motor from moving under torque. I don't trust the little steel bracket to hold up for ever, so I plan on fabricating my new bracket with chain stay support sometime soon!  If this was an aluminum bike, I wouldn't trust the little chain guard bracket at all!

Nickel plated half link PMC primary and PMC Z secondary drive chains to be replaced by BMX Nickel plated heavy duty chains!

Over all I'd rate the Cyclone 3000W motor to be a easy installation. Everything lined up perfectly on the drive side first try. On the non drive side it took a little measuring to get the spacers figured out just right. With the added space from the adapters I used to go from American to EU bottom bracket, I wound up using two spacers and a lock ring. Then the non drive side bracket, followed by two more lock rings. This gave me 2mm of extra space on the drive side bolts (where the spacers are), and when everything was torqued down, it put just the right amount of tension on the whole assembly to keep everything tight! Those 2mm disappeared when everything pulled to the drive side when torquing it all down. Perfect chain alignment! 

I really have to give Cyclone credit for getting it all so right! Yeah, the mounting brackets are generic, but they will work on most bikes. If you have any mechanical aptitude, and a few tools, you would have no problem fabricating your own to meet your specific bike needs. 

The only real complaint I have is with the factory freewheel. It's so loud and crappy, you can almost hear it breaking on the road before you ever hook a battery up to the bike! Yeah, like a crap time machine! You know it's garbage by hearing it when you spin the cranks. Having said that, and having said that I'll offer the SBP heavy duty freewheel as an upgrade, and only charge $50 to do the upgrade after the stock freewheel blows up, I'm considering only offering this motor in a bike with the upgraded part. If you insist on using the crappy factory part, the labor to change it out after it breaks will be $150 instead of only $50. You would have to be an idiot not to upgrade this part, and idiots need to pay extra when forewarned that this will happen! The cost of the SBP freewheel will have no extra markup costs. It's just as easy for me to install this in the first place as it is to install the factory crap freewheel! You only wind up paying more if you're a penny pinching idiot!

The SBP freewheel uses 2 bearings to help deal with end shaft torsion and sounds smooth as silk!

I love this motor in this bike! The Sixthreezero In The Barrel, with it's forward peddling Bottom Bracket position provides a ton of room to place the motor inside the frame with multiple motor positions that will work for whatever you have in mind! This bike is available in single speed, (my favorite) three speed, and if you have some steep hills where you live, you can also have it in seven speeds. 

I see no benefit in 7 over 3 speed in top end speed. The three speed Nexus may even beat the 11T rear sprocket by 1 or 2mph if you count chain skipping with throttle and pedal power applied at the same time! None of that with the 3 speed IGH! 

Most of the time I just leave my less powerful BBSO2 and BBSHD in 2nd gear unless I just want to drain amps off the battery and go fast. If you're taking off from a stop with the 3kw Cyclone motor, it's always best to start in 2nd gear with the Shimano Nexus 3 Speed IHG. The reason for this is the placement of the sun gear inside the hub. It's placement is in second gear, and is the strongest of the three gears. This motor has plenty of grunt force, and you want the strongest gear when taking off from a stop!


Still on the list of things to do:
1. Motor chain guard.
2. Upgrade all hardware to Stainless Steel.
3. Drive side aluminum motor mounting bracket with chain stay frame mount.
4. Gas tank style battery box.
5. Cut, solder and modify all wires to meet inside battery box. 
6. BMX chain for both primary and secondary drive. Cheap and Strong!
7. Three speed switch that don't suck!
8. Batman battery monitor.
9. Optional Springer front end with Hydro disk brake.
Yeah, all the extras! Only available with ISIS drive! 

Friday, December 22, 2017

Last Day At Work Before X-Mas 4 Day Weekend!

We had a LOT of bikes to build this week at the bike shop! Especially today! 

Early start with some eggnog still in my head this morning, and a flat tire on my bike I ride to work. This was probably one of the longest days at work this year. I can't believe it, but I got them all built for pickup! Yes, the feeling of accomplishment despite the exhaustion is nice!

Instead of fixing the flat tire (who has time for that on the last work day before X-Mas) I jumped on the 500W mid drive powered EVRYjourney prototype.

Tomorrow I'll be building my own bikes for customer pickup at 11am. After that, this Santa's bike building elf will have time to work on Ebikes again!

I think I'll have some time during the 4 day weekend to work on the above bike in the photo. All the zip ties need to go away, and the wire harness needs to be cut, shortened, and run threw the frame from the neck to the bottom bracket.

I liked riding this bike today. It's been a while since I've ridden a bike with the 500W mid drive. It would of been better if I had the throttle I ordered considering how tired I was after work today! I love these 500W motors, but if the company's only distributor for throttles can't deliver, then I may not be offering them in the future. I've been waiting on the throttle before I do the finish work to the bike. I think I'll just skip the throttle and sell it after I've taken care of the finish work and be done with them.

I'm too tired to go out to eat, but Mary wants Steak and eggs, so it's off to Norms we go.

This is the X-Mas Bike Elf signing off till tomorrow! 


Monday, December 18, 2017

Electric Bicycle VS Electric Motorcycle

All the time I read peoples comments that anything over 20mph is a motorcycle. Pathetic! 
IT'S NOT A MOTORCYCLE!
THIS IS AN ELECTRIC MOTORCYCLE!


Sunday, December 17, 2017

No Sunday Beach Bike Photo Day Today. Battery Box Day Instead!

It's about time to get started on building the mock board tracker gas tank/battery boxes! 

 The first battery boxes will be design built for the Sixthreezero In The Barrel bikes.

Instead of going for a beach ride, I ordered a sheet metal break, and a sheet metal corner shrinker stretcher. I have no idea where I'll put them in the garage home shop but I'll figure something out. Then I went out for a couple rides to pick up other tools and supplies. 


 I like using the back pack for my battery because it's so inconspicuous, but some days I just don't feel like wearing it. Nobody without a sharp eye has any idea I'm riding an electric bike with the back pack battery. The mock gas tank/battery boxes will be as inconspicuous as the back pack! They will look like a custom beach cruiser built with a board tracker theme.

The pre production models will be made from heavy gauge sheet metal and aluminum. All joints will be riveted together. The side covers for the first one will be a brushed aluminum with paint details to match the center sections. I'm thinking about trying varnished wood for the side covers as well.

I've always preferred welding over riveting, but for these mock gas tank/battery boxes, I think riveting the parts together is a better option. 
1. It will save on costs. I have to make them affordable or nobody will buy them! 
2. If one part gets damaged, it can be replaced without having to replace the whole tank/box!


 The second bike to get a gas tank/battery box will be the Firmstrong Bruiser. I really need to take some of my own photo's of the Bruiser bikes! The ones (above example) the company payed to have taken are terrible!


Early last summer I started making a hammer forging buck for the Firmstrong Bruiser models. I've changed some design elements since then, so I'll have to start all over and remake the hammer forming bucks from scratch. It sucks to do because I was almost finished before work got so busy I had no time for them, but I'll have a better box in the end than the original ones design! 

The Firmstrong Bruiser battery boxes will be different than the Board Tracker style, but will have several of the same design features incorporated into them. This design is a total secret at the moment. If I let the cat out of the bag now, and show the buck I've already started, a half dozen copy cats will have them before I can get my first pre-production box in a bike! 

I will need to get everything done for these two model bikes battery boxes in the next two or three months of California winter while bike sales are slow! As soon as summer is here, I won't have any time! 

After the first few pre production tanks are made and in the pre order test ride bikes, I'll be able to start taking orders! At best, all I can hope to do is get the prototypes made with the templates and bucks. I'll have no work to speak off for a few months until spring sets in and people want bikes again. From January 1st until May 1st is the time to order your ebike if you want it ready for spring!


Bike Alarm Tail Light

Yeah, you don't need a tail light or alarm, but with all the people who've bought new bikes from me this summer telling me that they had their bikes stolen and needed a replacement, I think it's a good idea! Tweakers HATE loud noises! Especially when they're stealing something!

This alarm tail light looks like a good product. I just ordered one for myself. If I like it, I'll order more for customers who want them.

Idem FCC certified rechargeable, wireless, 4 in 1 bike tail light, anti theft alarm, bike finder, and electric horn with remote control. 

Thursday, December 14, 2017

Making Custom Ebike Wiring Harnes

I'm waiting on some supplies that are back ordered before starting on custom harnesses. Before I start cutting into my wire harness, I figured it would be nice to take a look inside to see what the wires would look like and try and find out how other people are doing it. Butt end connectors could be used, but I really don't think you want or need them after reading this DIY article.

 
The factory supplied parts work, but look terrible with the connectors out in the open. They need to be tucked away where you don't have to see them. The only way to do this is to make your own wire harness. 


I've rewired hundreds of motorcycles over the years, but this a little more like electronics wiring and soldering. Smaller wires, less mechanical joints, and a whole bunch of different shrink wrap tubing go into making a clean Ebike harness! 

I stole the above photo's from e-bike-technologies.de .
The link to the nice wiring article. http://e-bike-marke-eigenbau.de/index.php/en/make-a-custom-made-wiring-harness

Wednesday, December 13, 2017

Sick Bike Parts "Front Freewheel - Ultra Heavy Duty"

I like parts that are dependable but I sometimes don't like paying a premium price for them.


Usually in the end it's well worth the investment.  
The "Front Freewheel - Ultra Heavy Duty" from SBP for the Cyclone motors is one such item. I'll leave it up to you if you want it or not. I'll even go to the trouble of offering it at cost with no markup for my trouble. No extra cost for installation either. However, if you buy a Cyclone powered bike from me, and choose not to upgrade this bearing with your purchase, there will be an additional $50 fee for installation plus the cost of the part when your stock freewheel stops working and you need it replaced. In for a penny, in for a pound. May as well spend the extra $119.95 and get the upgraded freewheel. I know you need it! You will too when your stock freewheel takes a dump far from home!

http://sickbikeparts.com/front-freewheel-ultra-heavy-duty/


Monday, December 11, 2017

A Real Cool Heat Shrink Tubing That Hell Can't Get Threw On A Dare At a Crossroad!

I hate zip ties!
They're great for a temporary fix or prototype, but should not be on a finished bike! If you have zip ties all over the place, then you're not finished! Get back to work you Hack!


This is some NASCAR quality abrasion resistant heat shrink! I have a 25' roll of it on the way! This will house all the wires from the hand breaks/shifter/throttle to the brake cables at each end of the bars to where they inter the frame for internal wiring, or battery box! Way overkill, but it ups the cool factor, and gets rid of the nasty little zip ties!

Oh man, I just dropped over a Franklin on some high quality heat shrink tubing! In the past 30 years I've been rewiring motorcycles, I doubt I've spent that much for the whole 30 years on heat shrink tubing! In those years, I've seen some guys use some crappy stuff to cover their wires. Most of that junk was Hygroscopic, that meaning that it attracts water and holds it. The stuff I'll be using can breath, letting any water content out!

This is some pretty special stuff, and I ordered some of it in bulk quantities to save .30 cents haha! I've studied law, mechanical law, etc, but the law of volume reads that 30c x 100,000 units, will kill a company by nickels and dimes. 

I ordered about a dozen different heat shrink tubing to accommodate any foreseeable need.  I suspect that some of the irregular quantities will still be around after I'm dead. Always better to have more of some stuff, then order more of the other more expensive stuff as needed. 

 https://www.cabletiesandmore.com/

Sunday, December 10, 2017

BBSHD Sixthreezero In The Barrel Cruiser Bike

Despite how happy I'm with the performance of the BBSO2 motor, I'm ordering a BBSHD next week. 

The motor kit I'm ordering will have the P850C color monitor, not the one in this photo.

All the bikes I'm building at the moment are for personal fun, and customer test rides. They are also 100% street legal! I've sourced the BBSHD at $200 below the local supplier, and can't resist picking one up at that price! I'll give the local guy a chance to price match before ordering and we'll see what happens. I would always rather support the local guy, but for one motor, $200 extra is a lot of cash! I could take that money and use it for a larger 52V battery the HD likes at 1000W! Your choice of programing. 750W street legal, or take a chance with 1000W of fun!

 P850C color monitor. I really like this display, and the local guy don't offer it with the BBSHD. The one he has is cool, but I don't see all the information on it as I do on the P850C, and I won't crowd the bars with other stuff that's not needed to get that info. So, as cool as it is, it's ain't $200 cooler than this!

Sunday Ebike Photo Day! Sixthreezero 750W BBS02B Three Speed Around The Block

It's always a nice day when I get a chance to get to the beach with a Ebike! Sunday's the only day I'm not too busy selling or building bikes, so I'm going to call it Sunday Bike Photo Day, and make it a regular feature on the blog.

It's been a few years since I've used any of my photography skills. The electric bike business gives me a chance to go to cool places and take photo's for the blog, and eventual website, so it's a win win for me. The other day I had all 25 bikes taken out of the back half of the garage, and I'm kicking myself for not taking some photo's for the craigslist adds. Oh well, most of the bikes I have for sale at the moment are pedal only, so no big deal. 

So here's the shots I took today. 

It's fire season here in So-Cal. Next will be rainy season combined with mud slide and flash flood seasons, and then earthquake season. All these at one time would still be better than just one tornado or hurricane season in my opinion! And Typhoon season also sucks! I've been threw those on Guam, and more than my share of tornado seasons in Illinois! The whole concept of my house with my family and myself getting blown away to OZ without a plane ticket is just unacceptable! Our youngest girl works for one of the Australian airlines, so tickets ain't that hard to come by!


New Facebook cover photo! At least until I have a clear day to take the same photo.

Not a cloudy day. It's smoke from the fires burning around LA.

In this photo, you can see the smoke rising up behind Malibu.

In this photo I took from above the beach, you can see the fire clouds a little better. This fire is past Malibu up in the Ojai area. The way the column of smoke rises up from the ground reminds me of a volcano eruption.

Satelite view of the fires. Best wishes to everyone up in the Ojai area!


This is the first time I've had the chance to ride the 3 speed version on the strand. I hate repeating myself most times, but the 3 speed In The barrel from Sixthreezero is twice as much fun to ride on the beach with the BBSO2 motor than the same bike with 7 speeds! I already came to this conclusion the first day I put it together. Now after a week as my daily commuter bike to work and back, and the trip up and down the strand, it's undeniable. 

The Nexus 3 speed internal geared hub in 1st gear can climb hills pretty good for a reasonable duration with this motor. I wouldn't try it up Pike's Peak, but for anything around my area, it works great. If you live in a hilly area, then go for at least a 7 speed bike. I was going to order a 20T rear sprocket, and I still will one day, but for the moment, I'd rather have more top end speed. All the hills I rode today were no problem with the stock setup, and I rode quite a bit of hills today! All but the steepest from the beach up to PCH were rode in 2n'd gear with some pedaling.

On the flat's and a fresh 17.5 Ah 48V battery I was doing pretty good at 32mph in 3rd gear without pedaling, and 35mph with some hard pedaling up a slight 3% grade. On the ride home I caught myself going 40mph down a slight grade with light pedaling in 3rd gear. The battery was reading 49V at the time.


Saturday, December 9, 2017

BBSHD Bracket

For use on BBSHD motors!


This is such a brilliant idea! 
I have my own invisible adapter for BBS02 and HD motors for beach cruisers made out of the BB adapters, but for bikes with the EU style bracket, this is the way to go. Especially if the bike you're using has a forward pedaling frame design like the one in the photo. The forward pedaling frame allows for the use of a bolt. I'm sure some gizmo can be made to fit in the kickstand area that would eliminate the need to use a nasty looking hose clamp on traditional bike frames. I hate hose clamps on bikes!


Tuesday, December 5, 2017

Sixthreezero In The Barrel E-Bike 2.0!

The Sixthreezero "In The Barrel" with the three speed Nexus IHG from Shimano is one of the coolest beach cruiser bikes available as it is, but add a motor, and the game is irreversibly changed for the better!

This is version 2.0 three speed. For version 1.0, I used a 7 speed In The Barrel (The bike used for this blogs cover photo).

You can't take a test ride on this bike without wanting one! It's impossible! Several dozen times now I've seen people who were indifferent to ebikes, and had never rode one, wizzzzzz by me at only half speed with the biggest smiles on their faces! You really have no idea until you've tried it!

 This bike has such a killer frame! They make awesome E-Bikes, but hold their own as just regular pedal only bikes, but lets face it, once you've had the E-Experience, just having a pedal only bike is sort of a bummer. Especially when you've been cruising up and down the strand on one of these!

Still just a prototype at the moment. Wire connections need to be extended so they can connect inside the battery box, and not be seen. This takes a bit of time to do, but it's worth it for a clean looking finished bike. Form is as important as function. You can have the coolest bike in the world that hauls ass and beats everyone on race day, but with wires all over the place, it'll just look like crap. I'll be using a fabric shrink wrap instead of the zip ties. This should add a extra level of cool to the finished bikes.


You can see how the wire connectors look out in front of the bike. This along with the zip ties are unacceptable.

I'll offer it with the standard 17T rear sprocket (30mph with a 46T front sprocket), or a 20T for more bottom end torque if you have a lot of hills to climb.  

 Standard 17T rear sprocket with Nexus 3-speed internal geared hub (IGH).

I still have a lot of things to do on this bike. The wires and shrink wrap as I mentioned above, and I'll need to put a new radius on the chain guard to better fit the 46T front chain ring. With the correct radius I'll also be able to lower it to where it should be over the chain. It looks fine without the guard, but I like it.

 This chain guard was meant for a much smaller front sprocket!

Brakes. Since the three speed only came with a coaster brake, I added rim breaks front and back. The way the seat stay is, I had to invert the rear to fit. And a couple more temp zip ties for the rear brake cable. On the production bikes, the cable and all the other important stuff will be routed threw the battery box.


Inverted rear rim break with Kool-Stop brake pads. Latest version of shop cat in background.

Front rim breaks with Kool-Stop brake pads.

Battery Box. Yeah, you know the style. It's been replicated quite a bit in the gas bike world. The first ones I'll be making myself out of tin and aluminum. Eventually I'll want to have a cheaper plastic and carbon fiber option available. I'll be making two sizes. One for 52V 20Ah packs, and a larger one for 72V battery packs for anyone wanting a 3000W fire breathing 50mph Cyclone motor!

I'll make them to fit the same curvature of the frames back bone and eclipse the bottom part of the tubing by 1/2 the tubing diameter.

This bike is using a BBSO2B Bafang motor. A BBSHD would be the better motor, but for a simple prototype (the little 02 ain't a bad motor), I didn't see the need to spend the extra money. Especially when the next one I build will have a 2000W Cyclone, and the one after that will have a 3000W Cyclone motor. I would rather save the extra money the BBSHD costs to build a bigger battery for the less expensive and much more powerful Cyclone motors! With the Cyclone, the motor kit itself is cheaper, but they need a much larger battery to reach their full potential. I already have both of the Cyclone motors ready to go with some cool improvements over the factory parts! 

The only place I'll be buying the BBS02B motors from for these bikes is Luna Cycle. I bet you can guess where I stole this photo from. They are local, and have upgrades to their kits over buying the motors direct, and it's always nice to support other local businesses when we can. Same thing goes for the BBSHD motors.

Yep, another Luna motor. The Mini 2000W Cyclone kit. 

Save the best for last! The 3000W Cyclone motor kit from Luna Cycles! 

Other options will be available, such as suspension front forks with hydraulic or mechanical disk breaks, drum breaks, Springer forks. Paint colors so long as it's black, matte black, red or white. Polished aluminum side covers for battery boxes, custom hand pin striping, etc. The list is too long for this post. Don't even get me started on pedal options! A guy can spend hours just looking at and talking about pedal options!

It's been a long road to get where I'm at right now, and It's not even the ending of the beginning. Now I need to get all these bikes out of prototype stage and into production bikes so next year in 2018, I can start on carbon frame mountain bikes, and all the other projects I have floating around in my head and sketched on bar napkins!

So the differences between the 1.0 seven speed version, and the 2.0 three speed versions are quite substantial. I would say that the 3 speed is about twice as much fun to ride! You don't have so many gears to worry about. It's just simpler. If you have to make a fast stop, no worrying about downshifting. Drop her into first when stopped at the light, or while cursing out the idiot who just cut you off! 

The high gear isn't as high as a 11T seven speed high rear, but you can still get up to 30mph on the flats with the BBS02B without pedaling, and if you're in a hilly area, just swap out the 17T to a 20T on the nexus for more hill climbing ability.Three speeds is all you will ever need on a cruiser bike. No need for 7 or more gears unless you're seriously into mountain biking. That's a whole other animal.

Thursday, November 30, 2017

Time To Buy More Motors!

The next motor will be a 800W geared rear hub drive Q128H with 750W controller and a 48V battery.


This combination is right at the edge of a street legal setup here in USA where we're limited to only 750W. I'll have several bike options for this motor setup, but the first will be a men's Sixthreezero EVRYjourney.

Pre production prototype bike in photo shown with a sweet little TSDZ2 500W mid drive motor. This motor was built for this bike! The production bikes will have no zip ties! Everything will be routed inside the frame. I even ran out of black zip ties! Now that I look at it in the photo, the white zip ties are a bit embarrassing to me, but ya use what ya got sometimes.


I have so many options for motors and bikes to use these days that blow the high priced factory bikes completely out of the water as far as reliability and power at less than half the price, that it's enough to make my head spin trying to decide on what to do next. I always have 5 or 6 projects floating around in my mind at a time. In my case, the projects are 3-5 different classes of bikes with different power level motors. 

What I want to do is not always what I should be doing. 
I've made the decision to concentrate on building street legal bikes for the moment. If I had all the money and time in the world, I would already have my 2000W and 3000W Cyclone bikes finished and ready for test rides. I have everything for them except the 52V 20Ah batteries. This is what I really want to be working on, but the batteries are a bit expensive, even though I'll be building them myself. I'll also be building custom battery boxes for these Cyclone bikes, and that's something I just don't have the time to work on for the moment. At some point, I'll be outsourcing carbon fiber battery boxes for these bikes, and that's one big project by itself.

What I should be doing, and have decided to concentrate on, are the street legal bikes for the company I work for Beachbikes Torrance. I'll be selling the Cyclone bikes myself under the name Duke's Moto Electric, but my employers have no interest in selling anything that powerful. The company owner has told me that once the bikes are complete, as in out of the prototype stage they're in now, that he would put them on his website. That's what I was waiting to hear all summer. The best news of the past decade for me! So now I need to get busy hiding wires in frame, and loosing all the zip ties I used to get the prototypes together. 

The next project bike will also be using the EVRYjourney, but will have a 500W Q motor, and then after that, a smaller 350W Q100 motor. Eventually the EVRYjourneys will also be available with BBS02 and BBSHD motor options. 

 Photo of Q motors stolen from ES.

Sometimes you need to start with baby steps. In my case I started a little faster than that, then went to the fastest stuff available. Now I'll be working backwards before moving forward up the speed ladder again, but it will happen!


Sunday, November 26, 2017

WAVE 2.0 Electric Bike

I had the opportunity to put a Wave electric bike together for a customer last week. Over All I don't hate the bike, although there are a few things I would do differently building a bike for the same price.


First, I would use a hub motor that is laced inside and outside of the motor hub. WAVE laces it's wheels to the motor from the outside only. The 12ga spokes bend on each other this way where they cross one another.


You can see from the above photo how all the spokes are inserted into the motor from the outside. It would be better, especially when using such large spokes to have them alternating one in, one out. My photo doesent show the extent of the bent spokes due to this lacing. Ideally, they would also use a single or double butted 13/14 spoke for more flex and durability. It took quite a lot of truing just to get the wheel straight and true enough to adjust the rear rim brakes.

The above photo shows the Shimano TZ derailleur. This is probably the cheapest derailleur they could of used on this bike. Sometimes you get lucky with the TZ's, and sometimes you don't. I find that most of them are about impossible to tune nicely. Don't expect smooth quiet shifts with one of these on your bike. Expect to hear KLUNKs when shifting, skipping gears and or riding up on gear without going into gear.

The bike uses a 6 speed freewheel. Not bad, but with such a heavy bike a 7 speed would be nicer. The motor and rims look decent from the outside.


The seat tube has had an extra chunk of metal welded to it to hide the wires. This adds some weight to the bike, but looks nice. Overall the frame and rack appear to be sturdy, although I do have an issue with the BIG hole they drill in the chain stay to run all the wires threw once exiting the extra chunk of aluminum they weld to the seat tube. It's a big chunk of metal, but the hole is 1/2 the size of the tube! I warned the customer to check for cracks in this area along with frayed wires from passing threw the BIG hole.


 The packaging was pretty good, although not as through as other brands. It had some pretty deep dings in the frame and neck from shipping.


Not the greatest welds on this frame. I consider an aluminum weld like this to be a sure sign of the bottom of the barrel in Chinese cheap manufacturing. Many Chinese manufactured brand specific frames have nice welds, but this adds to the cost of the bike.

The battery. I didn't have any time to really check it out, but it does have a Samsung sticker on it. Assuming that they are real Samsung batteries instead of the fakes cheaper Chinese manufactured ebikes use, this would be a positive point for the Wave bike.

Over all would I buy or sell one of these bikes?
 Much better bikes can be had for little more money. For $1200 don't expect to get a nice color LCD display. You'll get the cheap LED display like the one the WAVE 2.0 has. As I mentioned above, you won't get a hand laced wheel with 13/14 double butted spokes. You'll get 12ga, but at least you should get them laced in and out instead of all from the outside. In this price range you should also expect to get nicer welds on the frame. So my answer is no, I would not spend money on a WAVE 2.0 bike.

Saturday, November 25, 2017

Good day for bike sales and

Good day for bike sales and a ride at the beach!

I went into the warehouse to get together 10 bikes for a customer, and sold him another bike as well that was already assembled. Now I have a couple people coming over for two more bikes. 

Of course, all work and no play makes Chris a dull boy, so a trip to the beach was in order! I was feeling a little stir crazy. Work build bikes, home build bikes, work build bikes, home build bikes, work build bikes, home build bikes.


A few photo's at Redondo Beach with the Sixthreezero In The Barrel BBS02 750W E-Bike.

 I think I've found another cover photo!

 Maybe I just found two new cover photos!

 Yep. I still need to lace a drum brake into the front wheel.

 The Kool Stop[ brake pads are working pretty good in the rear. I just have to use a little extra common sense with only the rear brake for now.

 The nickel plated freewheel could work a little better. It likes to skip teeth at high speeds with both throttle and heavy peddling in high gears. I need to play with the chain line to see if that helps before I totally trash the product with a bad review. 

 Still using the back pack to hold my battery. At traffic lights I have my foot on the left pedal in front of the motor, and with the battery in the pack, nobody would guess it's electric.

This bike is great as a commuter to and from the bike shop, but it's a ton of fun down on the beach!